Articles by "Hydroponic"
Tampilkan postingan dengan label Hydroponic. Tampilkan semua postingan

Know what it takes to build your own High Pressure Aeroponics (HPA)

Gathering information on HPA is very important before building your own system. We can learn a lot from other people’s mistakes and just avoid heartaches. Why go through the school of hard knocks if someone else has done it already? The problem we have is knowing what information is good advice while others are poor. So let’s talk about some of my research here.

First let’s set this straight that true aeroponics is high pressure. It happens to be more complicated but the most rewarding when it comes to plant growth.

The design of HPA can be traced to 1970. However, NASA revolutionized in the 1990s by reporting it as the most efficient way to grow plants in outer space. Many studies have proven the benefits of growing plants in an aeroponic system, both on Earth and in space.

Here are some of the benefits – PROS:
  • It uses up to 98% less water than conventional growing methods
  • The nutrients used are 1/3 the amount needed for hydroponics and soil growing methods
  • We can plant more plants in a closer spacing
  • There is no cost for any soil
  • Some crops can produce up to four harvests annually rather than just two.
Even though aeroponics sound great there are a few downfalls – CONS:
  • There are more pieces or parts to purchase compare to other growing methods
  • It uses an expensive high pressure pump
  • HPA requires close monitoring and maybe frequent maintenance, mainly clogged spray head due to salt buildup.
  • The system depends on electricity to keep it running
  • Relative short failures of the system could lead to loss of your whole crop in minutes instead of hours.

Now, let’s talk about the specifics of building an HPA (High Pressure Aeroponics) system.


There are basically two types of aeroponics


One that NASA produced HPA (High Pressure Aeroponics), and the LPA (Low Pressure Aeroponics) lower cost system. LPA systems are the most common used and built by DIYers.
LPA systems use a standard magdrive pump couple to some PVC or tubing, and a few miniature sprinkler heads. The water spray from an LPA sprinkler head has large droplets that surround the plant roots. LPAs generally run the system 24 hours and 7 days a week, continually wetting the roots. The works well, and are cheap and easy to build. However they are not as efficient as HPA systems.

HPA systems must operate at a high pressure, normally above 80 PSI, ideal is 100 PSI. The high pressure is used to atomize the water through a small orifice to create water droplets of 50 microns or less in diameter. One micron is one-millionth of a meter. The average diameter of human hair is 80 microns. So we are talking about a really tiny water drop. HPA also must run on a much accurate time cycle. HPAs might run 1 to 5 seconds on, and then off 3 to 5 minutes. Specific components are required in controlling the timing interval and creating the proper size mist.

Droplet size

NASA research has shown that plants are more willing to absorb nutrient water in 5 to 50 microns droplets more effectively than any other sizes. Water droplet size is crucial for sustaining aeroponic growth. Too large of a water droplet means less oxygen is available to the root system. Too fine of a water droplet, such as those generated by the ultra-sonic mister, produce excessive root hair without developing a lateral root system for sustained growth in an aeroponic system.

In review, HPAs require high pressure to operate properly for producing the optimal 50 micron droplet size from the misters. Also, HPAs need precise timers that are adjustable down to seconds.

The components of our system:

As mentioned earlier, NASA as shown that plants ae more willing to absorb water in the 5 to 50 microns. Therefore, it is for this understanding that HPA (High Pressure Aeroponics) is more efficient than the most common Low Pressure Aeroponics system.

Again, to achieve the optimal conditions for plant development, it requires some primary components and tools.

The basic components of our HPA are as follows:
  • High-Pressure water pump
  • Pre-Pressurize Accumulator Tank
  • Electrical-Solenoid hooked to an adjustable relay timer
  • Pressure switch
  • Mister nozzles
The High-Pressure Water Pump

The main component of an HPA system is the water pump. The pump has to be able to produce the droplet size of twenty to fifty microns. These kind of pumps are usually diaphragm type or the reverse osmosis boosters. The pump should produce a constant 80psi, so try to find one that can generate 100psi or even more.

When you buy the pump, set it somewhere between 80 and 100psi, any adjustments later will be difficult to be made. If you planned an expansion of your system later on, then get a Shur-flow pump, they are commonly used in soda machines and carpet cleaners.


The Accumulator Tank

You can find these tanks in many homes and RV’s to keep the right water pressure in the pipeline. Mainly, they prevent the pump from overworking. These tanks are pre-pressurized and are divided into two spaces. One space takes up the rubber bladder which expands according to the water pressure, and the other space is taken by the pressurized air.

The pressurized air is used to move the water out when the faucet is turned on. So now, we assume you might be thinking why would you need a tank if you already have a pump that can create the pressure? Well, let us go a little bit back, the water pump is the main component of the HPA system and the most expensive one.

The accumulator tank is there to extend its lifetime and to reduce the time of usage of it. In the long term, the tank will save you money, because if the pump gets broken, the replacement will be way more expensive than the tank.

The accumulator tank has one more key role, and that is to create a constant pressure once the solenoid is opened thus creating the right size droplets. In a system, without the accumulator tank, the size of the droplets wouldn’t be constant, and they would be bigger than they should be.

The Electrical Solenoid

The sole use of the solenoid is to start and stop the water flow to the system when the timer goes on and off. It’s an electronically operated valve. The solenoid is plugged into a relay timer circuit. The system is pretty similar to the simple automatic lawn sprinkler. The best timers for solenoid control are the ones that are accurate to one second on, and in the minutes off.

The Pressure Switch

This part of the system is controlling the pressure. Some pumps have it included, but it can be purchased separately as well. What it does is tell the pump at what pressure it’s supposed to turn on and off. Basically, it senses the pressure of the water, and when it gets too low, it turns on the pump. Once it measures the right pressure, it turns the pump off again. It should be set to turn the pump on at 80psi and off at 100psi.

The Misters

Atomization of the water is achieved by pumping the water through small nozzles at high pressure. We want to save our nutrients, and the cost of operation, so smaller nozzles are what we need. Choose a full-cone nozzle pattern. Higher pressure nozzles have high velocity, and they can cut off the root hairs. Stay away from these. To prevent clogging, use a fine mesh filter prior to misting nozzles.

Source : gardeningwizards & aeroponicsdiy
Low pressure Aeroponic Systems (LPA)

Also termed "soakaponics" low pressure aeroponic systems are what most people are familiar with when they think of aeroponics. That's mainly because most all aeroponic systems sold at stores selling hydroponics supply's are low pressure systems. While the low pressure systems work very nicely, the large water droplet size is much different than in the high pressure systems.
Source : Aeroponic.net

The main reason the low pressure aeroponic systems are so popular is that they don't require much more in the way of cost or special equipment than other types of hydroponic systems. The simplicity and low cost of low pressure systems makes this type of aeroponic system very attractive to many home growers. 

While you don't need any special equipment or a special water pump. The standard fountain/pond pumps will do just fine. You do however want a pump that's stronger than you would for any other type of hydroponic system. That's the main and most important difference. That's because the pressure in the system will drop some with each sprinkler head you add. Fountain and pond pumps don't give a psi (pressure) rating, but the more GPH (gallons per hour) it can put out closer to the "max head height" the stronger (more pressure) the pump has. 

You will want enough sprinkler heads that the spray overlaps, and completely covers the entire root zone. Even as the plants get bigger and the root mass gets bigger. As the root mass gets big, it's often hard for the spray from the sprinkler heads to penetrate the thick root mass. If you design your low pressure aeroponic system so the roots are sprayed from above the root mass or near the top of it, the water will trickle down through the root mass much better than trying to spray them from below.


High pressure Aeroponic Systems (true aeroponic systems)


While the low pressure systems are the most common, high pressure aeroponic systems are the "true aeroponic" systems. That's because it takes the higher pressure (60-90 psi) to properly atomize the water into a fine mist with a very small water droplet size. This fine mist allows the roots to get a lot more oxygen than in low pressure systems. However it's more complicated and expensive to build a high pressure aeroponic system. 


What you'll need to build your own true high pressure Aeroponic system:

  • Accumulator tank (to act as the pressurized reservoir tank).
  • Solenoid valve (to open and close the feed line to the mister heads).
  • Cycle timer (to open and close the solenoid valve).
  • Fine spray mister heads (to spray the roots with a fine mist).
  • Small air compressor (to pressurize the accumulator tank).
  • Enclosed growing chamber for the root zone.
  • A collection reservoir to collect the runoff if you plan to recirculate the nutrient solution. 
  • While the basic design of the growing chamber and plant support can remain the same as with low pressure systems. The water (nutrient solution) delivery system is much different. Because of how often a pump would need to turn on and off (100's to 1,000's of times a day) it would ware out very quickly. So the water pump is eliminated in high pressure aeroponic systems. 
Source : Pixabay
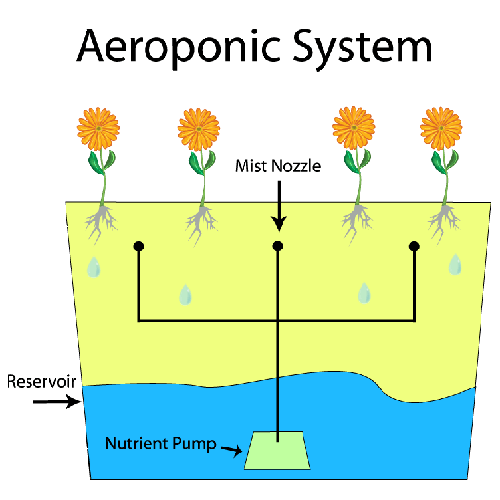
To do that they pressurize the reservoir. The easiest way to do that is by using an accumulator tank similar to the type used in RO (reverse osmosis) water systems. It's basically nothing more than a tank with a rubber divider/diaphragm in the center, creating two sides. Water (nutrient solutions) goes in one side, and compressed air goes in the other. The air is filled until the pressure reaches about 60 to 90 psi. That pressure pushes against the rubber diaphragm and pressurizes the reservoir side with the nutrient solution in it to the same psi. 

A water line runs from the reservoir to the mister heads in the enclosed growing chamber to mist the roots. A Solenoid valve is used to open and close the water flow through the line to the mister heads. The Solenoid valve open and close timing is controlled by a cycle timer. The cycle timer can open and close the Solenoid for as little as one second, to as long as the grower wants. Typically it's open/on for just a few seconds at a time, and off for only minutes before it sprays again. The cycle timer opens and closes the solenoid watering the plants roots with mist on this type of "on/off cycle" all day long.


Ultrasonic foggers

Ultrasonic foggers have also been used to create a mist in aeroponic systems, however with mixed results. Ultrasonic foggers are most commonly used to create visual displays in ponds, as well as on stage. They are also often sold around halloween with the halloween decorations too. While they do create a mist with a very small water droplet size, there is very little actual moisture in the mist/fog. 

The mist created from ultrasonic foggers also tends to drop to the bottom of the container. Making it hard to make sure the roots are completely covered by the mist all the time. Another issue with using foggers is that the plates tend to clog with mineral build up. The only plates that have shown to work with any reliability are the more expensive Teflon heads. They can sometimes be cleaned using white vinegar, or water and pH down, and wiping them off with a Q-tip. Some growers have combined using ultrasonic foggers along with the low pressure aeroponic design in the same system.

You also can read : How to Make Your Own Aeroponics System

Source : Homehydrosystems
Source : Hannainst
While the concept of the aeroponic system is quite simple, it's actually the most technical of all 6 types of hydroponic systems. However it's still fairly easy to build your own basic aeroponic system, and a lot of home growers like growing in them as well, and even get really good results using this type of hydroponic system. 

Like with any other type of hydroponic system, you can use many different kinds of materials to build it, as well as many different types of design setups to fit in your space. Your really only limited by the space you have, and your imagination.

Some advantages to using an aeroponic systems are they typically use little to no growing media. The roots get maximum oxygen, and the plants grow more rapidly as a result. Aeroponic systems also generally use less water than any other type of hydroponic system (especially true aeroponic systems). Also harvesting is usually easier, especially for root crops.

However there are a few downsides to aeroponic systems as well. Besides being a bit more expensive to build. The mister/sprinkler heads can clog from build up of the dissolved mineral elements in the nutrient solution. So make sure to have extras on hand to swap out when they do clog while you clean them. Also because the plants roots are hanging in mid air by design in aeroponic systems, the plants roots are much more vulnerable to drying out if there is any interruption in the watering cycle. Therefor, even any temporary power outage (for any reason) could cause your plants to die much more quickly than any other type of hydroponic system. Also there's a reduced margin for error with the nutrient levels in aeroponic systems, especially the true high pressure systems.

What you'll need to build your own basic Aeroponic system:

  • Container to hold the nutrient solution (a reservoir).
  • Submersible fountain/pond pump.
  • Tubing to distribute water from the reservoir pump to the mister heads in the growing chamber.
  • Enclosed growing chamber for the root zone.
  • Mister/sprinkler heads.
  • Water tight container for the growing chamber where the plants root systems will be.
  • Tubing to return the excess nutrient solution back to the reservoir. 
  • Timer (preferably a cycle timer) to turn on and off the pump.
How the aeroponic system operates is a fairly easy concept. First the purpose of the roots hang in mid air is so they can get the maximum amount of oxygen that they can get. The high volume of oxygen the roots get allows the plans to grow faster than they would otherwise, and the main benefit to this type of hydroponic system. 

Second, there is typically very little if any growing media is used, exposing all the plants roots. The plants are suspended either by small baskets, or closed cell foam plugs that compress around the plants stem. These baskets or foam plugs fit in small holes at the top of the growing chamber. The roots hang down inside the growing chamber where they get sprayed with nutrient solution from mister heads at regular short cycles. The regular watering cycles keep the roots moist and from drying out, as well as provides the nutrients the plants need to grow. 

The growing chamber the roots are in should be light proof, and almost air tight. It does need to allow fresh air in so the roots can get plenty of oxygen, but you don't want water to spill out, or pests to get in. Also you want the root chamber to hold in humidity. Ultimately what you want is the roots to get plenty of moisture, fresh oxygen, and nutrients. A a well designed aeroponics system provides a good balance of all three of those elements to the roots at the same time. 

Lastly, a major factor in aeroponic systems is the water droplet size. Roots sprayed with a fine mist will grow much faster, bushier, and with more surface area to absorb nutrients and oxygen with than roots sprayed with small streams of water like from small sprinkler heads. That translates into the plant canopy growing more rapidly as well. Aeroponic system types are categorized by the water droplet size.

You also can read : 3 Types Of Aeroponic System

Source : Homehydrosystems.com
Source : Pixabay.com/Gardening-green
One of the most common questions for beginner hydroponic gardeners is “What can I grow?” The simple answer is that given the right setup and nutrient balance, you can grow any plant hydroponically. To choose what plants would be best suited for your home system, you should consider the following factors: what kind of system you have or wish to build, how much space you have, how much experience you have, and your reasons for choosing hydroponics.

What kind of system do you have?

The two basic categories of hydroponic systems are Solution, or Liquid Culture and Medium, or Aggregate Culture. In a Solution system, such as Aeroponics or Nutrient Film Technique the plants grow directly in the nutrient-filled solution. This type of setup works best with a fast growing, shallow-rooted plants such as lettuce, spinach, radishes, and herbs.

Medium systems, such as Wick Systems or Ebb & Flow systems, utilize a growing medium such as gravel, sand or Hydroton. Because the medium provides good support for heavy plants, these setups work well for vegetables and herbs with deep roots such as comfrey, chicory, and beets, or those that are more top-heavy and need support such as beans, tomatoes, squash, and cucumbers.

If you don’t have a hydroponic set up yet, considering what kind of plants you wish to grow can help inform what kind of system you choose. If you love fresh herbs and salads, but only have a small amount of space to dedicate to your garden, you may do best with a small D.I.Y Wick System. If you are somewhat experienced and are looking for more exotic options or a way to upgrade your hydroponic garden, you may want to consider going for a more high-tech system such as Aeroponics.

How much space is available?

Space is a big factor to consider when choosing which plants to grow in your hydro garden. If you only have a small space to dedicate to your garden, you would do best to avoid squash, melons, and other large plants. Although technically you could grow these in a small system, you will never get the same quality of fruits or vegetables on your plants as those that have adequate space to grow. In small systems, the easiest and most rewarding choices are leafy greens and herbs. These are plants that grow quickly, can be continually harvested and do not need a lot of space to expand or develop fruit.

If you have a large space such as a greenhouse, garage or patio, you can move up to a more advanced system and grow those voluminous plants that need trellises and deep root support. Large gardens are perfect for experimentation—you could also try producing multiple different varieties of your favorite fruits and vegetables.

What is your experience level?

Your level of experience with gardening and your specific reasons for getting into hydroponics will also influence your choice of what plants you want to grow. If you are an absolute beginner, it would be wise to stick to quick growing, easy plants so that you can get the maximum benefit out of your experience without becoming discouraged. Although hydroponic gardens are simple and easy to maintain once you know the basics, it is easy to get discouraged if you start out with an overly complex system.


If you are experienced with hydro gardening and are looking to delve into more exotic or complex plants, your only true limit is yourself. Some gardeners even go so far as to grow whole fruit or nut trees hydroponically. If you have​ space and the will to experiment, the sky is the limit. A few ideas for more experienced gardeners are quince, tobacco, large melons, pumpkins, sunflowers and shrubs such as honeysuckle or blackberries.

Source :www.thespruce.com
Source : Pixabay.com
Hydroponics is a form of gardening that uses no soil, but instead grows plants in a solution of nutrients mixed with water. There are many advantages to hydroponic gardening:
  • Plants grow faster. Experts suggest that plants grow at least 20 percent faster in hydroponic systems than they do in soil. 
  • Yields are 20 to 25 percent bigger with hydroponic systems, compared to growing in soil. 
  • No soil is required, which can be a distinct advantage in areas where existing garden soil is poor, or for apartment dwellers where growing in soil is inconvenient. 
  • Hydroponic growing takes less space. Plants don't need to grow extensive root systems to obtain the nutrients they need, so plants can be packed together closely—another advantage for those who must garden indoors. 
  • Water is saved. The reservoirs used in hydroponics are enclosed to prevent evaporation, and the systems are sealed. This allows plants to take up only the water they need.
The first step to setting up your first hydroponic garden is selecting a system that best fits your needs from among several options. Important factors to consider include: how much space you have, what you want to grow and how much, cost, and how much available time you have to spend maintaining the system.

The three most basic setups recommended for beginners are the wick, water culture, and ebb and flow. All three of these systems can be built from individual components purchased separately, or you can buy a complete setup kit from online retailers or in a hydroponics store.

Wick Systems
Wick systems are the simplest system mechanically, and the easiest to set up because there are no moving parts. The system contains a reservoir filled with water and nutrients, and above it, there is a container filled with growing medium. The two containers are connected by a wick, which draws the nutrient-filled water up into the growing medium, where it is absorbed by the roots of your plants. This system is great for learning the basics, but it may not work well with large plants or with water-hungry plants such as lettuce, because the wick cannot supply water fast enough. However, this system works extremely well with micro greens, herbs, and peppers.

Water Culture

A water culture system is another extremely simple system to set up. In this system, the plants are placed into a styrofoam platform that sits right on top of the reservoir holding the solution of water and nutrients. A bubbler air pump is added to the reservoir to deliver oxygen to the plant roots. This system is ideally suited for water-hungry plants but is not so well suited for more long-lived plants such as tomatoes.

Ebb and Flow

Ebb and flow systems are slightly more complex in design, but they are extremely versatile. This system works by flooding the growing medium with a water/nutrient solution and then draining it back into the reservoir. To do this, the system requires a submersible pump with a timer. One of the greatest advantages of ebb and flow is that you can use the timer to customize your plants’ watering schedule based on the plant size, number of plants, temperature, humidity, etc. You also have the option of potting plants individually for easy customization or filling the entire tray with growing medium and planting directly in the tray.

Choosing What to Grow

Just about any plant can be grown hydroponically, but for beginners, it is best to start small. The best choices are herbs and vegetables that grow quickly, require little maintenance, and do not need a broad range of nutrients. Fast-growing plants are best since they make it easy to assess how well your system works and tweak it as necessary. It can be a real letdown to wait months until harvest time only to find out your system is not working properly. Maintenance-free plants are great for beginners because they allow you to focus on learning about your system—you can move on to more complex vegetables later. If you are growing a variety of plants, it is also important to make sure that they are similar in their nutrient requirements, so that they grow well together.

Lighting

Hydroponic systems are often indoor systems positioned in places where there isn't access to direct sunlight all day long. Most edible plants require at least six hours of sunlight each day, with 12 to 16 hours even better. So unless you have a sunroom or other such space with lots of window exposure, you'll likely need to provide supplemental grow lights. Hydroponic kit systems usually come with the necessary light fixtures, but if you are piecing together your own components, you will need to buy separate lighting fixtures.

The best lighting for a hydroponics system is HID (High-Intensity Discharge) light fixtures, which can include either HPS (High-Pressure Sodium) or MH (Metal Halide) bulbs. The light from HPS bulbs emits a more orange/red light, which is great for plants in the vegetative growth stage. 

T5 is another type of lighting used in hydroponic grow rooms. It produces a high-output fluorescent light with low heat and low energy consumption. It is ideal for growing plant cuttings and plants with short growth cycles. 

Make sure to put your lighting system on a timer so that the lights come on and go off at the same time each day.

Room Conditions

It's very important that a hydroponic system is set up in the right conditions. Key elements include relative humidity, temperature, CO2 levels, and air circulation. The ideal humidity for a hydroponic grow room is from 40 to 60 percent relative humidity. Higher humidity levels—especially in rooms with poor air circulation—can lead to powdery mildew and other fungal problems.

Ideal temperatures are between 68 and 70 F. High temperatures may cause plants to become stunted, and if the water temperature gets too high, it may lead to root rot.

Your grow room should also have an ample supply of carbon dioxide (CO2). The best way to ensure this is by making sure the room has a constant flow of air. More advanced hydroponic gardeners may supplement CO2 levels in the room, since the more CO2 available, the faster your plants will grow.

Water Quality

Two factors can affect water's ability to deliver dissolved nutrients to your plants: the level of mineral salts in the water, as measured by PPM; and the pH of the water. "Hard" water that contains a high mineral content will not dissolve nutrients as effectively as water with a lower mineral content, so you may need to filter your water if it is high in mineral content. The ideal pH level for water used in a hydroponic system is between 5.8 and 6.2 (slightly acidic). If your water doesn't meet this level, chemicals can be used to adjust the pH into the ideal range. 

Nutrients

The nutrients/fertilizers used in hydroponic systems are available in both liquid and dry forms and in both organic and synthetic types. Either type can be dissolved into water to create the nutrient mixture required by the hydroponic system. The product you use should include both the main macronutrients—nitrogen, potassium, phosphorus, calcium, and magnesium—as well as the important micronutrients, which include trace amounts of iron, manganese, boron, zinc, copper, molybdenum, and chlorine.

Many nutrient/fertilizers are available that are designed for hydroponic gardening, and you should have good results if you use them according to package directions. But avoid using standard garden fertilizers in a hydroponic system, as their formulas are designed for use in garden soil, not hydroponic systems. 

Choose hydroponic nutrient products that are designed for your specific needs. For example, some are marketed as being best suited for flowering plants, while others are best for promoting vegetative growth, such as the greenery of leafy vegetables.

Additional Equipment

In addition to the basic hydroponic setup, it's a good idea for beginners to invest in a few additional items. 

You will need meters to test the PPM and pH of the water, as well as the temperature and relative humidity of the room. There are some combination meters available that will test the pH, PPM, and water temperature. You can also purchase meters that measure the temperature and/or the humidity in your grow room.

Depending on your climate, you may need a humidifier or dehumidifier to adjust the relative humidity in the grow room to an optimal level. 

You may want to have some kind of fan or air circulation equipment to improve the air flow in your grow room. Even a simple oscillating fan works well, but as you get more experienced, you may want to invest in a more sophisticated intake-and-exhaust system.

Good Starter Plants

Some plants that work very well for beginners just learning the basics of hydroponic gardening include:
  • Greens such as lettuce, spinach, Swiss chard, and kale
  • Herbs such as basil, parsley, oregano, cilantro and mint
  • Tomatoes
  • Strawberries
  • Hot Peppers

Systems For More Advanced Gardeners

Two more complicated systems are best reserved for hydroponic gardeners who have already learned the basics: the N.F.T. system, and the aeroponic system. 

N.F.T. stands for Nutrient Film Technique. It uses a constant flow of water/nutrient solution that flows constantly in a loop from a reservoir through a growing tray, where plant roots are suspended in air and absorb nutrients as the solution flows by. But if something goes wrong with the pump mechanism, the roots can dry quickly when the flow stops. This system requires a user who can monitor the machinery and fix it quickly if problems arise. 

An aeroponic system is a high-tech method in which plant roots are suspended in air and are misted every few minutes with a water/nutrient solution. It is a highly effective method but one that requires sophisticated pumps and misters. If the equipment has problems, the plant roots on will dry out and die very quickly.

Source :www.thespruce.com
Flood and Drain (Ebb and Flow) systems are very popular with home hydroponic growers for many reasons. Besides how easy they are for anyone to build, you can use almost any materials you have laying around to build them with, so you don't need to spend much money to grow plants hydroponically. Also they can be built to fit in any available space you might have (both indoors or outdoors), and there is no limit to the different and imaginative ways to design them for that space. Along with being inexpensive and easy to build, plants grow very well in flood and drain systems. The flood and drain system works basically like it sounds, by simply flooding the plants root system with nutrient solution. Only periodically rather than continuously. 

How a hydroponic flood and drain system operates quite simple. The main part of the flood and drain system holds the containers the plants are growing in. It can be just one plant, or many plants/containers in series. A timer turns on the pump, and water (nutrient solution) is pumped through tubing from the reservoir up into the main part of the system using a submersible fountain/pond pump. The nutrient solution continues to fill (flood) the system until it reaches the height of the preset overflow tube so that it soaks the plants roots. The overflow tube should be set to about 2 inches below the top of the growing media. 

When the water filling/flooding the system reaches the overflow tube height, it drains back down to the reservoir where it recirculates back through the system again. The overflow tube sets the water level height in the flood and drain system, as well as makes sure the water (nutrient solution) doesn't spill out the top of the system while the pump is on. When the pump shuts off, the water siphons back down into the reservoir through the pump (draining the system). 

What you need to build a Flood and Drain (Ebb and Flow) system:
  • A container for the plant's roots to grow in.
  • A container (reservoir) to hold the nutrient solution.
  • A submersible fountain/pond pump.
  • A light timer to turn the pump on and off.
  • Some tubing to run from the pump in the reservoir to the system to be flooded.
  • An overflow tube set to the height you want the water level.
  • Growing medium of some kind.

There are many different ways to build a flood and drain system, and they are very good for growing small to medium size plants. Even for growing large plants with larger flood and drain system designs. You can use just about anything to build one including buckets, tubes, 2 liter bottles, storage totes, water bottles, an old ice chest, trash cans etc.. Just about anything that can hold water can be used. The imagination doesn't stop there either, there are many ways to flood and drain the roots in the system too. Below are some examples of how the three most common ways used to flood and drain the systems work. 

(Tip 1) Make sure there is a way air can get in the top of the overflow without spilling water out. A "T" connector with an extension that is a few inches above the water line will work nicely. This will keep air pockets from forming in the system and make sure it floods and drains properly. 

(Tip 2) Make sure the overflow tube is bigger than the water inlet tube from the pump. Otherwise because the water is only going out through gravity, and water is coming in through pressure from the pump, you could wind up pumping in more water than what is going out the overflow. That would lead to water building up and spilling out the top of your system, unless you reduce the pressure (volume) from the pump.

There are basically three main types of flood and drain system setups

Plant containers in series design

Source : Homehydrosystem.com
This type of setup is most commonly used when many different containers with plants are being watered (flooded) at the same time. It's important to remember that the system with the plants (containers) to be flooded (watered) needs to be above the reservoir, like on a table top or bench. That way the water can flow back to the reservoir by simple gravity, and thus drain the system correctly.

Source : Homehydrosystem.com
First multiple containers are all connected together through tubing so that when the system is flooded, they all flood evenly, and all at the same time. For simplicity, instead of having a separate overflow for each container being flooded, there's usually only one overflow tube. It connects to the system at the base where all the containers are connected to. And when the water height reaches the top of the overflow, it spills over and goes back to the reservoir to be pumped through the system again. The height of this one overflow tube will set the height of the water level in all of the connected containers with the plants in them (as long as it's level). You can change the water height in all of the connected containers by simply adjusting the height of the single overflow tube. 

Flooding tray design


Source : Homehydrosystem.com
The flooding table/tray flood and drain (ebb and flow) system type setup is useful when you want to place plants in the system temporarily, need to be moving them around a lot, or starting plants to be placed in another larger system. Instead of flooding separate containers with plants in it, this method only floods one container. Usually a shallow square or rectangle container that sets on top of a table. The reservoir usually sits directly underneath with easy access. 

Source : Homehydrosystem.com
Water is pumped up from the reservoir into the flooding tray on one side, and the overflow is on the other side of the flooding tray. That makes sure the water actually circulates from one side of the tray/table to the other. Like any flood and drain (ebb and flow) system, the overflow tube height sets the water height during the flooding cycle, and can be adjusted as needed.

Source : Homehydrosystem.com
 The plants are grown in regular plastic pots or baskets, and placed in the flooding tray like regular potted plants. However, unlike regular potted plants, hydroponic growing media is used to pot the plants instead of using potting soil. Once the plants get big enough, they can be transferred into a permanent hydroponic system.

One downside to using the flooding table is the algae growth, and should be cleaned out regularly. Because the top of the tray is usually left open, light is allowed to get in to the nutrient solution in the bottom of the tray, That allows algae to grow. The algae alone isn't really bad for the plants, but it does use up dissolved oxygen in the water.

Serge tank flood and drain (ebb and flow) system design

Source : Homehydrosystem.com
The serge tank type of flood and drain setup is useful when more vertical space is needed. Typically with flood and drain systems, the reservoir is always lower than the hydropnic system. That's so the water (nutrient solution) can drain out of the system through gravity back into the reservoir through the overflow, and when the pump is off. But you can still set up a flood and drain system even when the water level in the reservoir is higher than the hydroponic system it's supposed to flood and drain back from. That is with the use of a serge tank. 

Source : Homehydrosystem.com
The serge tank type of flood and drain system costs more to build because there are many more parts needed. It works on the principal that water seeks it's own level. In other words, the water height in one container will be the same in another container when they are connected below the water line. The serge tank serves as a temporary reservoir that controls the water height in all the containers with the plants in them, and is only full during the flooding cycle.

Source : Homehydrosystem.com


The serge tank flood and drain (ebb and flow) system operates by pumping water (nutrient solution) from the much larger main reservoir into the serge tank when the pump timer goes on. As the water level rises in the serge tank, the water level rises evenly in all the connected plant containers at the same time. When the water level gets high enough, a float valve in the serge tank turns on a pump in the serge tank. The pump in the serge tank then pumps water back into the main reservoir. At this time both the pumps are on (pump in main reservoir, and serge tank).

After the timer for the pump in the main reservoir shuts off, the pump in the serge tank is still on. The pump in the serge tank continues pumping all the water back into the main reservoir (draining the system) until the water level gets low enough. At that point a second float valve shuts off the pump in the serge tank.

Source : Homehydrosystem.com
The wick system is the simplest of all six types of hydroponic systems. That's because traditionally it doesn't have any moving parts, thus it doesn't use any pumps or electricity. However some people still like using an optional air pump in the reservoir. Because it doesn't need electricity to work, it's also quite useful in places where electricity cant be uses, or is unreliable.

The wick system is an easy type of system to build when first learning about hydroponics, and/or you just your want to get your feet wet first. This type of hydroponic system is also often used by teachers in classrooms as experiments for kids. Both to help explain how plants grow, as well as getting them interested in hydroponics.

What you need to build a wick system: 
  • A bucket or container for the plant.
  • A bucket or container for the reservoir.
  • A good wicking growing media like coco coir, Vermiculite, or perlite.
  • Some strips of material like felt or good wicking rope.
How a wick system operates is like it sounds, it basically just wicks up nutrient solution from the reservoir to the plants using the process of capillary action. Meaning it sucks up water to the plants through the wick like a sponge. Typically good wick systems will have at least two or more good size wicks to supply enough water (nutrient solution) to the plant. The bucket/container with the plant in it basically sits right above the container used for the reservoir. That way the water doesn't need to travel up very far to get to the growing media with plants.

 Downside of wick systems

The biggest downside's to a hydroponic wick systems is that they don't really work well for larger plants that need to drink up more water. Their really more suited to grow smaller non-fruiting plants, like lettuce and herbs. While the wick does suck up (wick up) moisture to the plants roots, the larger the plant is, the more water it will need to drink up. If they are fruiting plants, they will need even more water to support the growth of all the water absorbing fruit as well. 

Wick systems also have the disadvantage of being less efficient at delivering nutrients. Heavier feeding plants may need nutrients faster than the wicks can supply them to the roots. Lettuce and herbs are generally light feeders, while plants like tomato's, peppers and most fruiting plants are heavier feeders.

Another downside to wick systems is that plants don't absorb nutrients and water evenly, and the wick cant tell what nutrients the plant needs. The plants take the nutrients and water it needs, and leaves the rest of the nutrients in the growing medium. This can eventually cause a toxic buildup of mineral salts in the growing media. So flushing the excess nutrients from the root zone (growing media) with plain fresh water should be done regularly, like once a week or so.

Wicks 
The wick itself is probably the most important part of the wick system, because without a good absorbent wick the plants would not get the moisture and nutrients it needs. You will likely need to do some testing of different materials to see what works best for you. When looking for a good wicking material, you'll want to use something that's absorbent, but is still resistant to rotting. Then washing the wick good first before you use it, can significantly improve the wicking ability of most materials.

Some common materials people have used for wick systems are things like, fibrous rope, propylene felt strips, tiki torch wicks, rayon rope or mop head strands, braided polyurethane yarn, wool felt, wool rope or strips, nylon rope, cotton rope, stripe of fabric from old clothing or blankets etc. etc. 

Make sure to use enough wicks to support the plants water usage. That will depend greatly on how you build your wick system, type of plant your growing, and growing medium you use. You'll likely need at least 2-4 wicks unless it's a real small system. Also the shorter up the wick the water has to go from the reservoir to the growing media and roots, the more water it can transport to the growing media.

Once the nutrient solution makes it up the wick to the growing media, you want to use a very absorbent growing media to further wick up and hold moisture. Some of the most commonly used growing media's for wick systems are things like coco coir, Vermiculite or perlite. And in some cases, even water absorbing polymer crystals have been used too. 

The Reservoir  

The wick system reservoir can be large or small, you just don't want it to ever run dry. Also you want the water level to remain high enough so the water (nutrient solution) doesn't need to travel up very far to get to the growing media and root zone. You'll want to top off the reservoir with fresh nutrient solution as needed, as well as clean it out and change it completely once in a while too. Simply because algae and/or microorganisms can begin growing in the food rich water, especially if it's not light proof. 

Because the wick sucks up water and nutrients evenly, and the plants don't use or absorb them evenly, a build up of excess nutrient salts can build up in the growing media over time. So you'll want to flush it with plain fresh water regularly as well. Probably something like about every couple weeks. That will reduce the likelihood of the nutrient salts building up and reaching toxic levels for the plants.

Optional air pump 

Using an air pump and air stone to aerate the water in a wick system isn't necessary, however it can be beneficial. While the roots should be able to get oxygen from the small air pockets in the growing medium, they also absorb dissolved oxygen directly from the water itself as well. Along with helping to aerate the water, the moving, and rising bubbles keep the water circulating. Keeping the nutrient solution water moving around keeps the nutrients in it evenly mixed up all the time. If the water is still, the nutrients can settle toward the bottom over time. However if you are going to use an air pump anyway, you may want to just build a water culture system instead.

Source : gthydro.co.za
What is NFT?

NFT is the growing of plants, bare-rooted in long, waterproof channels, down which flows a very shallow stream of re-circulating water, into which are dissolved all the minerals required to grow healthy plants.

Who invented NFT? 

The idea of NFT was conceived and born at The Glasshouse Crops Research Institute in the mid 1970’s in England, lead by Dr Allen Cooper and his team of horticultural scientists. 

Why was it thought to be necessary? 

In the United Kingdom at that time most Tomato crops were grown in soil, with expensive heating to grow crops to yield results early in the season. The main competition came from Dutch growers, but with the advent of the EEC, other European producers were able to send cheaper produce to Britain all year round. The British glasshouse industry was under extreme financial pressure, and lobbied the government of the day to start research programs to find better and cheaper ways to produce their food requirements. Hence the work done at The Glasshouse Crops Research Institute was started.

What happened next?

‘The Grower’ magazine published in the UK, published an article in the mid 1970’s on the then experimental NFT findings. The magazine found its way to New Zealand, where the local glasshouse industry had just received the horrendous news that the price of crude oil was about to increase by about 70%. Most NZ growers in the mid 70’s used oil for heating, this was going to cause major cost problems for them, so the NFT report, claiming cheaper heat input was seen as a savior, even if it gave no increase in yields.

One of the largest greenhouse Tomato producers in the southern hemisphere at that time was PTO Growers in Auckland. They converted one of their many commercial greenhouses to the NFT system as described in the magazine. The results were to say the least very disappointing, but as there was no direct contact with the NFT inventors, they thought it must be something they were doing wrong, and started a few tests to see if they could get the system to perform as stated in the article. Many months later, and after many people had got together to sort out the many problems, they finally got it to work as it was intended.

The New Zealand horticultural industry took to NFT like the proverbial ducks to water, and within a few years over 50% of all tomatoes produced in glasshouses in NZ were in NFT or other types of Hydroponic systems. Other crops followed, Lettuce, Herbs and Strawberries, until today there are very few crops not grown in NFT, including many flowers. 

The problems the initial NZ growers encountered had not been seen in the UK, as all trials were in small experimental units. When growers in the UK also converted commercial greenhouses over, they also had many of the same problems, these have since all been attended to. When converted into commercial scale units, they found a few basic principals had been overlooked as to what plants require to grow. The main one being the Oxygen required in the root zone by all plants. 

Today we have a very strong NFT growing community, and additional work is ongoing to improve quality and quantity of produce grown. 

What are the basic principals on which NFT works? 

The fundamental basis of NFT is that the nutrient solution flows down a covered gully in a thin film (1mm deep) A thin film is essential as it allows much of the Oxygen required by the plant to be taken from the air above the roots. The roots form a dense mat in the channel, and because roots grow into those of the adjacent plants, the whole mat becomes an anchoring point, just as if they were planted in soil, no plant movement. The shallow film of liquid flowing under the roots ensures a permanent supply of water, and minerals. The upper surface of the root mat, although moist, is in the air. This ensures a permanent supply of Oxygen. Thus the reason for many crop failures in water culture (lack of oxygen) is overcome. Panda film (black inside, white outside) 

Many crop failures in the early years were due to gullies of insufficient size, and the root mat blocked the gullies, causing flooding or ponding of roots, leading to Oxygen starvation, root death, and finally plant death. Gullies that were too long were also a problem, again depleting the dissolved Oxygen as the nutrient went further down the gullies. Round pipe is not flat based, and cannot have a film across the base, this leads to the lowest roots being submerged at all times and again root death. Round pipes will work for hobby growers in some conditions, where gully length is very short, and pumps can be turned off for a period of time allowing the roots to be exposed to air when the gullies drain out.

The slope of NFT gullies is very important in eliminating ponding, and a fall of 1 in 40 is recommended. If using the Panda film type plastic film gully, then the smoothness of the floor or surface it is placed on is critical, as any dips, indentations or hollows can cause ponding. 
The length of the gullies is also limited to ensure all roots that are in the film of nutrient can get their Oxygen from the dissolved Oxygen in the nutrient. 18 meters is the maximum to ensure this with most crops, under normal climatic conditions. In hot climates the length is often shortened as less dissolved Oxygen can be put into warmer water.

Nutrient returning to the main tank has to be re-oxygenated, and the best way to achieve this is to use a Spa Pool venturi, drawing in fresh air to oxygenate the nutrient, it’s also the cheapest way to ensure maximum dissolved Oxygen.

Where is NFT today?

The industry has progressed to a point where New Zealand, Australian, and American companies now export NFT systems and technology to the rest of the world. 
There is sufficient information freely available to all growers, to ensure they put in the correct equipment and design for success.

Yields obtained by NFT growers are significantly higher than thought possible only a few years ago. Glasshouse Lettuce growers in soil can expect 7 crop turns per year if they do everything right, NFT growers have taken this from 7 crops per year to a point where some are now doing in excess of 12 crop turns per year, with less water usage and nutrient intrusion into the ground. Outdoor lettuce growers in soil expect 4 to 5 crops per year, while the Hydroponic equivalent produces 8 to 10, and at some sites where climatic conditions are ideal up to 12. Tomato growers produce at lower heating costs for out of season winter crops, and at higher yields per Sq meter, with the added advantage that they also get a better quality end product, again with no runoff to pollute the environment, and less water use.

Australian outdoor Lettuce NFT bench system under hail cloth for protection.
What’s the future for NFT?

Growing spray free (toxic free) is possible. 
People who want toxic free food can now buy this from their local Hydroponic supplier. 

In the future it should be possible for all commercial Hydroponic growers to make a ‘living’ supplying consumers with what they want, at a price that everybody is happy with, and not pollute the environment. Clean, pure water is becoming a scarce commodity in the world, recycling Hydroponic systems use a fraction of the water that soil growers have to use, and waste products are much less, and easier to dispose of. 
Areas where drought is a problem to field growers and food is scarce need never be without food, providing clean water, electricity and sunlight are available, Hydroponic growing makes more economical use of what water is available.

New Zealand indoor sliding NFT gully system for Lettuces.
USA indoor NFT system for Basil.
Source : Pgohort.co.nz